Project Marketplace Guide
Table of Contents
Why Create a Project for Project Marketplace
Project Marketplace gives clients the opportunity to browse and buy projects directly from you. For clients, this will eliminate uncertainty, give them the option to hire instantly, and give them pricing transparency. Buying a project also eliminates the back and forth process involved in fielding responses.
For you as a talent, creating projects gives you another great way of earning money on Voices.
When you create a project you:
- Control the scope of work
- Get hired without the back and forth of auditions and responding to jobs
- Create the project once and have clients come to you
- Create projects for the things you love to do and sell what you do best
- Customize packages within your projects to allow for pricing flexibility
Getting Started
You can post an unlimited number of unique, feature-rich project listings in Project Marketplace at any one time.
For a demo walkthrough of how to create a project on Voices, check out this video.
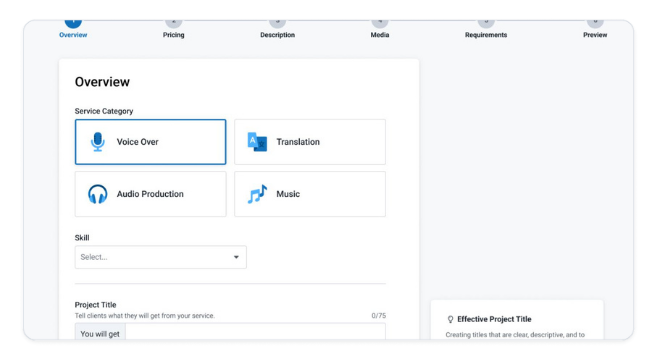
Overview
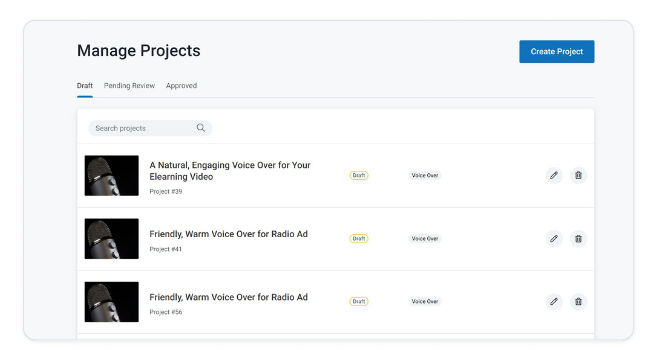
1. Under the Me dropdown, go to Manage Projects.
2. Click on the Create Project button at the top-right of the page.
3. Start with the Project Overview by choosing your Service and Skill.
4. Fill in a strong Project Title that clearly describes what the client will get from your project. We’ve provided some examples of strong titles right in the platform to help guide you. Keep in mind the maximum character count of 75 characters.
5. Fill in any other relevant details—some fields related to the Service and Skill you’ve selected will populate automatically, others you’ll need to fill in.
Quick Tip: Keep in mind that whatever your original project title is, once approved and live on the site, the URL created from that title will be fixed and unchangeable. You can always update your project title for that project, but the original URL will stay the same. Create a new project, and you can enter a new title that will create a new URL.
Pricing – Creating Your Packages
Non-Broadcast Voice Over, Audio Production, and Translation
1.Scope of Work: You’ll have the option of creating 1 or 3 packages within each project. The default is set to 3 packages, with the exception of Voice Over Broadcast, which we’ll cover shortly. Each package will have included package attributes and optional add-ons.
We recommend building 3 packages within each project (non-broadcast, audio production, and translation projects only) to give yourself and the client maximum flexibility and to attract clients who have different budgeting needs. The 3 packages are: Essential, Enhanced, and Elite.
Look at how your package tiers compare with one another. We’ve built some logic into the platform to help with this, but keep it in mind as you build your packages.
Your Essential Package should be your most affordable and entry-level package, and you should build up from there.
Your Enhanced Package will include a few more extras, for a medium price point.
Your Elite Package should be the most detailed, with the most included, and with the highest price tag attached.
2. Define the Number of Words, Delivery Days, and number of Revisions included in each of your package tiers. If you need more information on what each of these entails, hover over the i icon for a tooltip.
Delivery Days: Set a custom delivery time with Delivery Days for each package. The delivery time of the project is a huge determining factor for clients when they’re deciding on the purchase. Make sure you set a delivery date that is manageable for you, but enticing to potential clients.
Remember that the Delivery Days for each project include the amount of time it will take you to deliver a complete project, including revisions, starting after a client submits their requirements to you.
Revisions: Choose how many reviews and revisions a client will receive, from 0 to unlimited, for each package that you create. These revisions are changes that you will be making during the specified Delivery Days, so be sure to choose a number that matches what you can provide during that time period.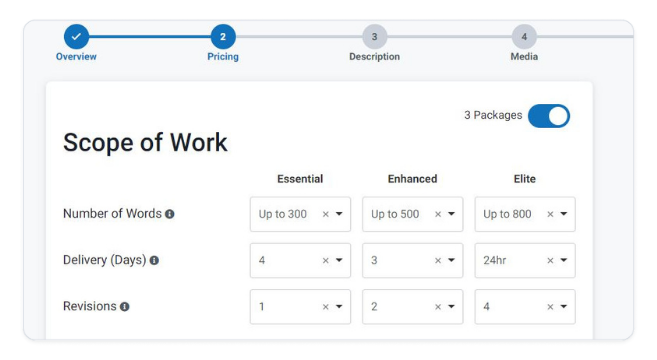
3. Included Package Options: The included package options will differ depending on which Service or Skill you’re creating a project for.
All Broadcast Voice Over projects will include a Broadcast Use License, a Commercial Use License, and a High-Quality Audio File, so you’ll see these automatically checked off as a default. Non-Broadcast Voice Over will not include the Broadcast Use License.
We’ve provided tooltip definitions right in the platform so that both you and the client have a clear understanding of what these terms reference.
Broadcast Use License: Rights granted to a person or company to use the creative work for the purposes of promoting a product or service in paid broadcasting channels, like radio, TV, or online ad.
Commercial Use License: Rights granted to a person or company to use the creative work in a commercial setting.
High-Quality Audio File: An audio file that is 16-bit, 44.1 kHz stereo .wav file or higher resolution.
Other options you might wish to include are things like Script Proofreading, Live Directed Sessions, and Background Music. We’ve listed the options you can choose from and you simply need to check off which of these you’d like to include in each package within your project.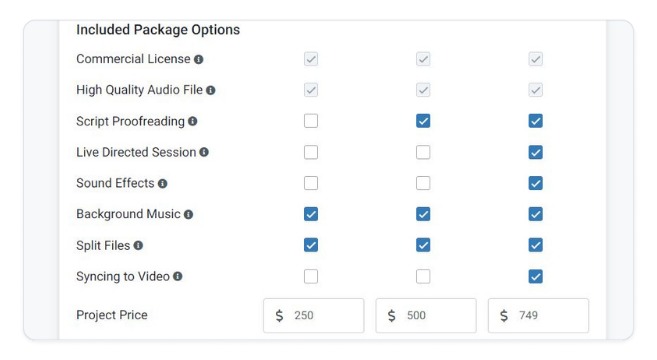
4. Project Price: Once you’ve built out each of your packages, you can set your Project Price at the bottom of each package column. This will be the base price that the client will pay. Below that we’ve listed what you’ll earn after the platform fee so that you can adjust your pricing accordingly.
Project prices can range from as little as $100 to as much as $10,000.
When deciding on your pricing, think about previous work you’ve done and what you earned. When did you feel like you were adequately paid for what your effort was worth? Alternatively, when did you feel like you quoted less than what the work actually ended up requiring? All of this should factor into your pricing.
Consider the amount of time you will spend completing a project and the amount of skill you need to complete it. The more skilled you are, and the more in demand that skill is, the more you may be able to charge for your services.
If you are unsure what to charge, check out our rate guide, do a bit of online research, or look at what freelancers are charging on other sites, for similar work. Take a closer look at those who have about the same amount of experience as you do and what they are charging for similar projects.
5. Add-Ons: Once you’ve created your project packages, take a look at the optional add-ons and think through what a client might want to add to your package if they want something specific but don’t wish to go up a full package.
You can include these here and add in your prices. Again, you’ll see what you earn underneath the pricing field, so that you can adjust your pricing as needed. Keep in mind that if you’ve already checked something off as part of your Included Package Options for that package, it won’t be available for you to also include it as an Add-On.

Broadcast Voice Over and Music – Pricing by Usage
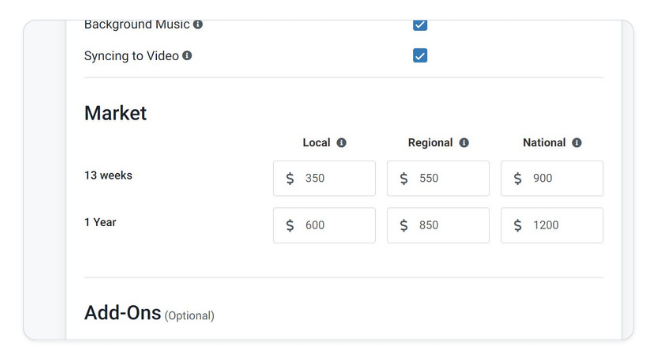
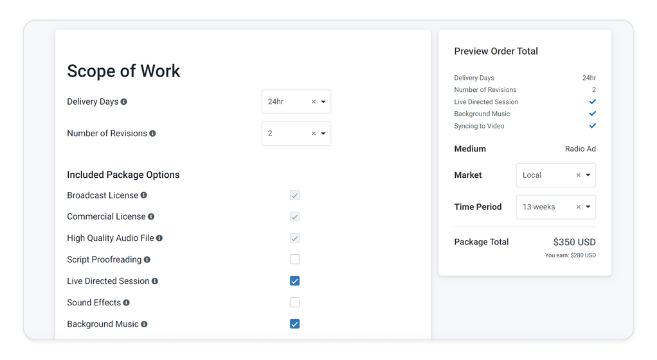
Voice Over Broadcast and Music projects will function similarly to the other services and skills in the way you set them up with delivery days, revisions, and package attributes, but there will just be one package to fill out, and the main pricing differentiator will lie in the Market section instead of Essential, Enhanced, and Elite packages. You won’t see a Project Price section, like you do for Non-Broadcast Voice Over and the other services; instead, you’ll see Market/Time Period Combinations.
For a Broadcast project with Television Ad or Radio Ad as the skill: you’ll set your prices for Local, Regional, and National Usage (Market) combined with 13 Weeks or 1 Year (Time Period).
For a Broadcast project with Online Ad as the skill: you’ll see Worldwide (Market) coupled with 13 Weeks or 1 Year (Time Period) and a pricing combination for each.
Keep in mind that your prices for broadcast voice over must meet the minimums found in our rate guide.
This gives clients the option to purchase what they need and to make sure you’re paid appropriately. You’ll still control your included package options and add-ons, but your main pricing levels are based on usage.
For Music, usage is broken down by Single Use, Five Use, and Unlimited Use, and based on a perpetual license.
If you’re unsure of how to price usage, check out our rate guide.
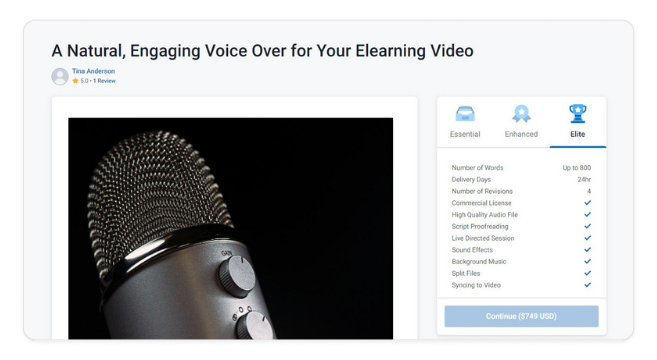
Preview Order Summary
As you’re building all of the packages in your project, you can reference the Preview Order Summary to the right of the page to preview the package pricing as the Client will see it. You’ll be able to click across the top of the Preview Order Summary to see how your Essential, Enhanced, and Elite packages will look and what they will include. If anything doesn’t look quite right in this preview, simply go back to your packages and adjust as needed.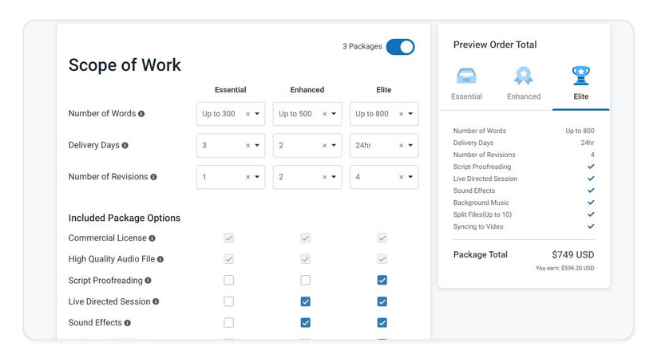
A Voice Over Broadcast project’s preview order summary will look like the below, referencing the Market and Time Period combinations:
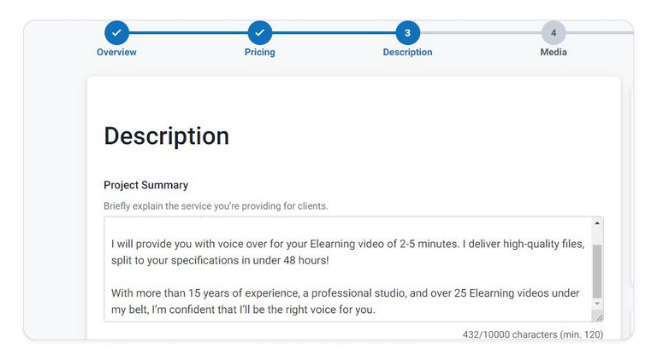
Adding a Project Summary
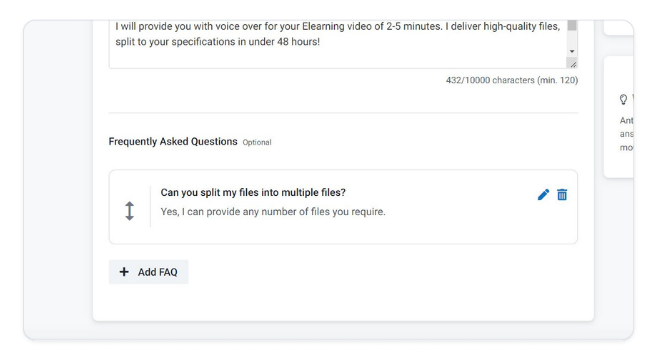
The Project Description is made up of your Project Summary and your Frequently Asked Questions.
Your Project Summary provides clients with more detail on what they’ll receive with this project and what type of prior experience you’ll bring to the project—what sets you apart? This helps clients to fully understand what to expect and why to purchase your project.
Adding Frequently Asked Questions
Setting up FAQs in your project listing will help clients better understand what you’re offering. Think of these as anticipating questions the client might have to help them move forward with their purchase. Voices has provided some specific questions you can use that align with the Service or Skill you’ve selected for your project. You can also add custom FAQs if you wish.
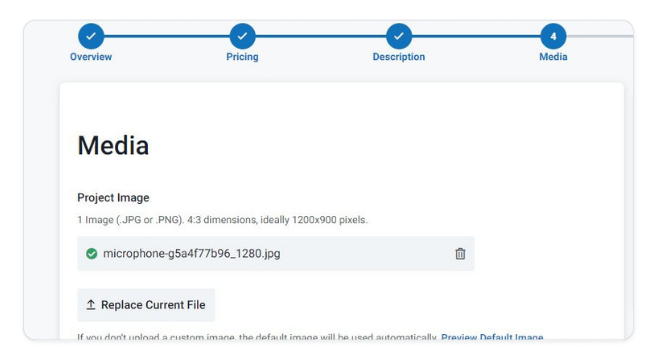
Uploading a Project Image
Your Project Image is an incredibly important part of your listing as it’s what will show up visually to represent your project when clients are searching the Voices website.
You’ll see the option to choose a default image, which Voices has pre-selected based on the Service you’ve chosen for your project; however, we highly recommend adding a custom image to really make your project stand out on the site and catch the eye of the client. Once you’ve found the image you want, save it to your desktop, and you can drag and drop the image from your desktop or browse your computer for the file.
We know it can be challenging to select the right image, so here’s some guidelines to follow:
Recommended image size: Please follow the size guidelines we’ve provided on the platform: .JPG or .PNG, 4:3 aspect ratio, ideally 1200×900 pixels, file size no larger than 5MB. To check what size your image is:
Mac Users – Find the image file in your Finder, right-click the image and select Get Info. A pop-up window will open with the dimensions of your image displayed in the More Info section. The dimensions show the pixel height and width of your photo.
PC Users: On a PC, right-click on the image file, look at Properties, and then view the Summary or Details tab.
Resizing images
There are many free online tools to help you resize your image to specific dimensions. Canva is one great tool and RedKetchup Image Resizer is very straightforward and walks you through step by step. There is a section to adjust your Aspect Ratio to our recommended dimensions, a section for adjusting pixels, and a section for cropping if necessary.
Image quality
Use sharp, crisp, clear images. Avoid low-quality images (poorly cropped, pixelated, blurry, stretched, or squashed images.) Using high-resolution, eye-catching images will help your project stand out to potential clients.
Number of images per Project
Voices allows only one image per project, so choose wisely and follow the provided guidelines.
Image usage and commercial rights
Only use images that you have the permission to use for commercial purposes. (More on sourcing images below.)
Relevancy
Project images must directly relate to the service you’re providing. Random images are confusing to clients and can lower the chances of your project being purchased. More information on choosing the right image can be found below.
Never share contact information
Don’t share any contact information in your Project image. This includes any website or social media details. All communication about a project must take place on Voices.
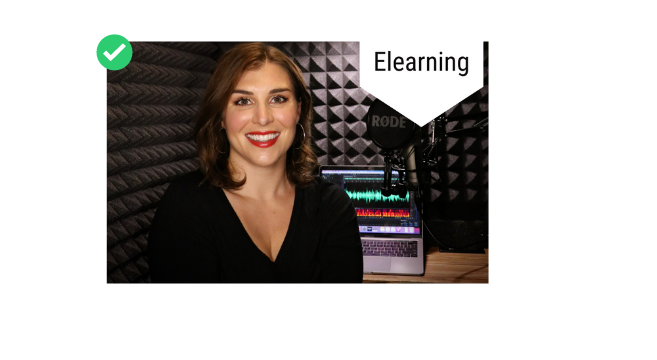
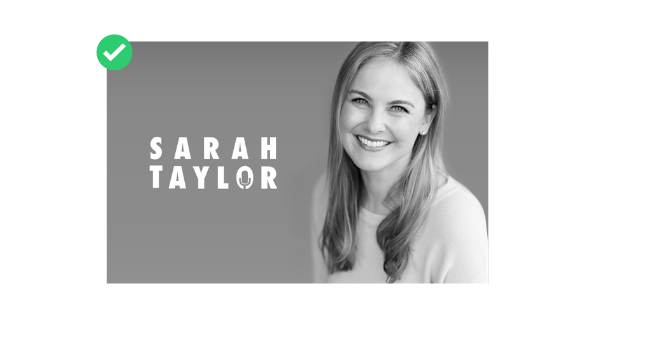
If you’re using text, use it wisely
To avoid a cluttered marketplace, we ask that if you add text to your image or create a logo, you ensure that it’s not cluttered and looks professional. As above, do not include contact information of any kind.
Make sure your individual projects stand out from one another
If you have more than one Project in the Marketplace, unless you’ve gone with the default image, each Project’s image and title must be unique.
Represent Yourself Well
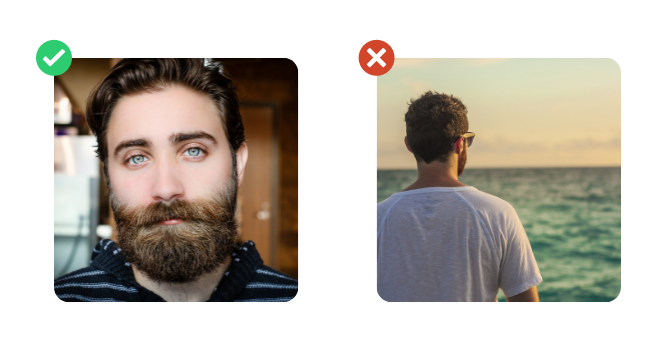
If you’d like to use a photo of yourself, show yourself clearly and face the front.
Standards
Project images must meet Voices’ Terms of Service and Content Guidelines. If your Project image doesn’t meet these standards, it will not be approved. Examples include adult material or any other objectionable content.
Using a Photo of Yourself
The following relates to using a headshot or photo of yourself for your Project image, not for your Voices profile.
Represent yourself well and build trust with the client
Take a photo of yourself from a front-facing angle to give the client an accurate idea of who you are. You’re selling your work and your skills, and your photo should build a sense of trust and credibility with the client.
Take the picture so it works well as a project photo
When you take a picture of yourself, use landscape mode. If necessary, re-size the image to the correct proportions using the recommended image specifications (.JPG or .PNG, 4:3 aspect ratio, ideally 1200 x 900 pixels, file size no larger than 5MB).
You can make the necessary adjustments using one of the free tools mentioned above, like RedKetchup Image Resizer.
Keep it visually uncluttered and focused
Make sure that you take the photo in a well-lit area with an uncluttered background, and that the final photo is not blurry or pixelated.
Choosing a Photo that Represents Your Work
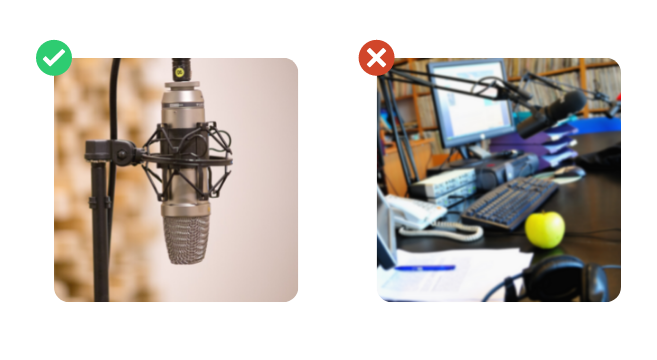
If you don’t go with a photo of yourself, think about the service you’re offering in this project and how best to represent it visually.
For example, a voice over project might have a close-up of a cool microphone.
Music composition might be a photo of an open score with musical notation.
Audio Production might be a close-up of the soundboard.
Orchestral Music for a video game might have a cool image of a video game character that really captures the emotion of the type of music you’d compose.
Get Creative
You’re representing your project, but you can also think outside the box a bit. For example, if you’re selling a soothing voice over for a nature video, you could choose a photo that represents the calm voice over work that you’ll do for that video.
If your project is an audiobook narration, you could choose a close-up photo of a stack of books with headphones on top. Going on to a site like Pixabay and putting in some different search criteria can give you some great ideas. (See more on stock images below.)

Use Text Wisely and No Contact Information
In order to keep Project Marketplace uncluttered, we ask that if you are using text in your image, you do so wisely, make sure it’s professional, and do not include any contact information (including website or social media.) We also ask that you not include any calls to action that might encourage clients to contact you off of Voices, i.e. “visit my website.” Including logos of companies you’ve worked for is fine, provided you have the necessary permissions to do so, and that you display them well.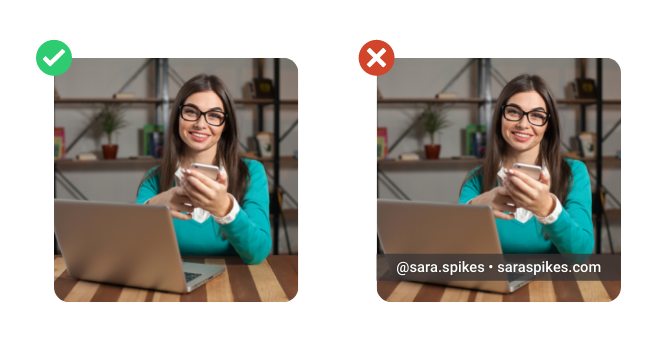
Using Stock Images
Stock Image Sites
There are numerous sites that provide high-quality stock images. Some examples are: Canva, Pixabay, Unsplash, and Pexels.
Commercial Rights
Most stock image sites carry a large catalog of images that are free or very inexpensive to use and they will specify whether you can use an image for commercial purposes. Make sure you have the right permissions before proceeding.
Choose a Different Image for Each Individual Project
If you’re offering a number of different projects, make sure you seek out the best image to represent each project individually. Think not only of how each image looks on its own, but of how it would look once on a page with other project listings. Ask yourself whether the image you’ve selected truly represents your project well.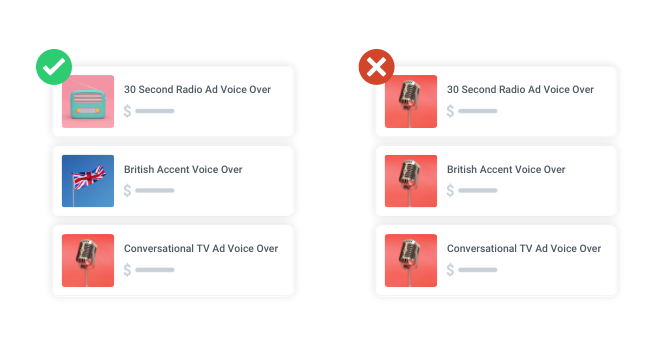
Voices Photo Checklist
- Does my photo match the specified requirements and dimensions indicated on the platform? (.JPG or .PNG, 4:3 aspect ratio, ideally 1200×900 pixels, file size no larger than 5MB)
- Have I included a crisp, clear image that represents the type of work I’m selling in this project?
- If I’ve used a headshot or another photo of me, is it clear and does it show my face fully? Is the photo well-lit and is the background uncluttered?
- If I’m using a stock photo, does it represent my project well, and do I have the proper permissions to use it for commercial purposes?
- If I’ve used text, does it look uncluttered and professional?
- Have I ensured there is no contact information in my images? (Including website and social media.)
- When I preview my project does the image look clear and are its proportions correct?
Media – Project Examples
You can select up to 3 samples of your work to attach to your project. You’ll see the option to either select from Demos or Portfolio Samples you already have connected to your Voices profile or you can upload files of your sample work from your computer. Make sure whatever you choose to include here is the best example of your work and makes sense for the project you are trying to sell.
If you’ve selected more than one project example, you can re-arrange the order they appear at the bottom of the page. The first project example listed will be what appears to clients when they’re searching or browsing.
Quick Tip: If you choose the option to select your project examples from among your profile Demos or Portfolio Samples, you’ll see that the relevant demos/portfolio samples will populate below for you to choose from. The demos that populate are connected to the skill you selected when you created the project. If you don’t see the demo you’re looking for, make sure you’ve tagged them correctly in your profile to match the relevant skill.
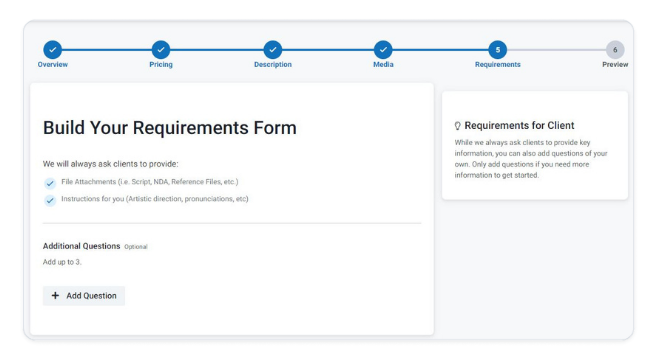
Requirements for Client
This final step is for you to request anything you need from the client to get the project completed once they’ve purchased it. We’ve set up any default requirements based on the service you selected—things like the script, an NDA, or any reference files—but you can add up to three additional questions if needed. Take the time to think through what information you really need from the client to hit the ground running once the purchase has been made.
Preview Your Project
The very last step in the process before you submit your project for approval is to take a careful look over the preview. This preview is how your project will appear to the client so you want to make sure it’s appearing the way you want it to and is completely error-free.
Here’s a quick final checklist of things to confirm before you hit submit:
- Check your photo: Does my photo look good? Is it clear and is it the right dimensions? Does it represent my project well? Does it follow all the guidelines Voices provided of what to do and what to avoid? Is it free of contact information?
- Check your demos: Do my demos sound clear and high-quality? Did I upload the right ones? Do they accurately represent the project I’m selling?
- Check your Project Title: Is it a strong, descriptive title? Is it error-free?
- Review your Packages: Does each package build up from Essential? Do I have everything included in each package that I want to?
- For Broadcast Voice Over: Have I reviewed the Voices rate guide ranges and priced appropriately?
- Review Add-Ons: Are the Add-Ons showing up the way I want them to? Are the prices correct?
- Project Details: Is my Project Summary error-free? Do a final proofread. Any spelling and grammar errors undermine your credibility with clients.
- FAQS: Are all the relevant FAQs listed? Am I happy with my answers? Again, make sure to proofread these one last time.
- Review Order Summary: Is everything under my Essential, Enhanced, and Elite packages correct? If I have a Voice Over Broadcast project, is my pricing entered correctly?
Quick Tips Summary
- DO choose professional images that speak to your work—and be sure you have the right to use them for commercial purposes.
- DO make your project easy to browse.
- DO proofread your work. Double check the project title and project summary. Ensure you’ve fixed any spelling or grammatical errors.
- DO NOT share your contact information or personal information in your images or anywhere else, including in your project summary.
Submitting Your Project for Approval
Once you’ve done a thorough final check of your project’s preview and gone through the checklist, you’re ready to hit submit!
As soon as you have done so, your project will move from your Draft tab to your Pending Review tab. You’ll also receive an email that lets you know your project has officially been submitted for approval.
Our Voices support team will review your project to make sure it meets all the criteria and isn’t missing any important information. They will let you know if any further information is needed to get it approved. If it’s approved, you’ll get an email letting you know and your project will move from Pending Review to the Approved tab.
Once Project Marketplace is fully up and running in a few months, as soon as your project is Approved, it will move to the Approved tab, and you’ll also be able to see it active on the Voices website. For now, all Approved projects will live in your Approved tab until Project Marketplace goes live.
Why Would a Project Be Denied?
A project will be denied if it does not align with our Content Guidelines and Terms of Service. Examples would be adult content or objectionable content.
Managing Your Projects
You can always navigate to Manage Projects from the Me dropdown menu at the top-right of your Voices account.
Under Manage Projects you’ll see Draft, Pending Review, and Approved tabs. While you’re working on or editing your projects, they’ll live in the Draft tab. Once you’ve submitted a project for review, it will move to the Pending Review tab. Once a project is approved, it will move the Approved tab. You’ll receive email communications throughout this process so you know the status of each of your projects.
Each project you have in your Approved tab will have an Active or Inactive label. Active indicates that the project is live and viewable on the site, inactive indicates that it is not published or active on the site. (This functionality will not be live until full launch this summer.)
Each of your projects will also have a service label and you’ll have the following options to manage each project individually:
Eye icon: Clicking on the eye icon will make your project inactive.
Crossed-out Eye icon: Indicates that this project is currently inactive on the site. Clicking on this will make your project active.
Pencil icon: Click on this to edit your project.
Double-squares icon: Click on this to duplicate your project.
Trash can icon: Click on this to delete your project.