
The Complete Guide to Voices for Talent
Table of Contents
Joining Voices
Your success is our success: that’s been our mantra since we started back in 2015. To this end, we employ an incredible team of passionate and dedicated people who want you to be successful in the development of your career.
In this guide, we’ll walk you through how to use the Voices platform. First things first…
Is Voices right for me?
If you’re an experienced professional looking to expand your clientele and add big names to your portfolio, we can help. We open doors to working with some of the world’s largest brands because of our reputation and experience in the creative services online industry. Instead of you calling gatekeepers and spending precious time trying to make the right connections from home, we facilitate those relationships for you. This means you just focus on bringing your unique skills to every job opportunity and building another revenue stream while we handle the networking for you.
If you’re new to the industry and looking for a place to get started we’ve got you covered, too. As an expert in the audio services industry, we’ve got the resources to support you as you get set up and best of all, we’ve got the connections to get you booking that first, fifth, and one-thousandth job. There’s nothing worse than getting all set up to do freelance work and then having no job opportunities. We’ve helped thousands of talents go from newbie to professional and we’d be happy to help you do the same—this industry is big enough for all of us.
Who Voices is not right for.
Anyone not willing to put in the work. As much as we’d love to give everyone a job just for signing up with Voices, the reality is that clients choose the best talent for their job. That means you’re going to need to set aside time each week, even every day, to respond to job opportunities. And you’ll want to be consistent! Even if you’re not booking work right away (which is totally normal) the process of responding to jobs is great practice and you’d be amazed at the progress you can make just by responding to jobs. We often see those who persevere end up booking work once they find their groove. Like most things, it’s a matter of doing the work and not giving up.
What do I get with Voices?
- Access to over 42,000 companies posting more than 5,000 jobs each month
- Hassle and fee-free payment
- Support network of Voices staff, resources, and fellow successful creatives here to help you grow your business
Does it sound like Voices might be a good tool for you to secure more leads and grow your business? Let’s get to it then!
Creating Your Account
Create your account in 3 easy steps:
- Click here and select ‘Find Work as a Talent” to create your account.
- Verify your email address – so we know you’re not a robot.
- Add your mailing address – so we know you’re in a country we can work with.
Now that you’ve created your account let’s talk about the types of memberships available to you.
Memberships on Voices
We have two types of memberships: free Guest members (which is what you are when you first create a profile) and subscribed members (which is what you are when you pay for a membership with us).
![]()
As a Guest member you can:
- Make a profile – so you have a presence on our site, similar to your own personal website
- Tell us about your skills – so we know what kind of jobs you want to see
- Upload your creative portfolio – show off your unique skills! Plus, you can be found in search by clients if you have a demo or portfolio sample
As a Guest, you can only respond to a client’s job when they invite you to it. Clients invite you to their job through your demos and portfolio samples.
![]()
As a subscribed member you can:
- Get easy access to clients and their jobs – allowing you to unlock new income opportunities
- Automatically receive public job invites – as we match your profile to the best-suited jobs for you
- Achieve higher visibility in search results – so clients see your portfolio samples first
More details about each plan can be found here.
Starting From My Home
Whether you’re a Guest or a subscribed member, MyHome is your landing page when you sign in to your account. It’s your headquarters for managing all aspects of working with us. You’ll see your:
- Job matches
- Jobs you’ve been shortlisted for
- Profile checklist
You’ll also find links to manage your jobs, payments, messages to/from clients, and account settings in the top navigation bar.
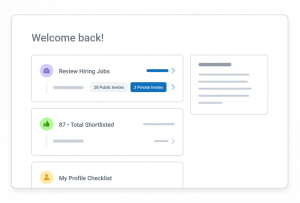
Quick tip: Your Profile Checklist is a great place to see at a glance which pieces of information you still need to add to your profile. Once you click on ‘Add’ next to any of the recommendations, you’ll be taken to the relevant spot in your ‘Edit Profile’ view where you can easily add whatever information is missing.
Read more about maximizing your workflows and opportunities here.
Completing Your Profile
Your profile and your creative portfolio are essential to connect you to the right opportunities. They are your resume of work and your personal advertisement in our marketplace. Potential clients can learn about you, your experience, and the services you offer. They can view your profile, review your demos and portfolio samples, read your ratings and reviews, and invite you to their job— right from your profile.

Job opportunities are sent to you primarily based upon the service(s) and skills you add to your profile but also reference fields such as language, gender, age, genre, software, and demo tags depending on the service(s) you choose.
Be sure your profile is 100% complete because the more complete your profile, the better we can match you with opportunities, and the more work you book. It’s worth the effort!
Your next step: Login to your account and click “Edit Profile.”
Quick tip: You can only edit your profile on a computer or tablet. Editing on the mobile app is not currently possible.
Let’s go through each section of your profile.
Personal Info
Personal Info houses all your public-facing information. Clients see what you write here, so be sure it’s professional, authentic, and most importantly, information you’re comfortable being public.
Let’s take a look at what makes up your Personal Info.
Your next step: Click the ‘Personal Info’ button from the left toolbar.
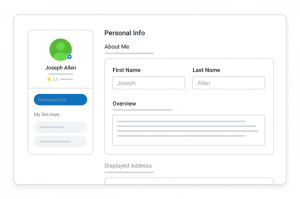
About Me
Your About Me section contains your name and overview.
Overview
Your Overview should be a brief summary of yourself. Share a bit about yourself as a creative professional—talk about your career, your background, what kinds of projects you like to work on, and what it’s like working with you. Feel free to add some personality here!
Quick tip: Talk about yourself in the third person.
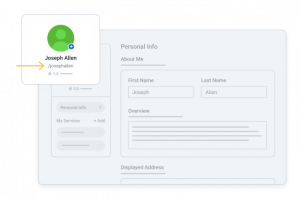
Profile Link
Your username is used to create your profile link. Your profile link will take anyone straight to your profile.
Your profile link looks like this: voices.com/profile/*your username*
Your username is auto-generated when you sign up. You can update it once here. After which your username cannot be changed.
Displayed Address
You can add your city, state/province, country to your profile. This information is used in location-based search results when clients are looking for a freelancer in a certain area.
Profile Photo
Clients are more likely to trust and hire talent with a profile photo. Upload a photo of yourself to present a professional, polished image.
Quick tip: For best results, upload a square image with equal dimensions and a picture of yourself that represents who you are as a creative professional and business owner.
To upload your picture:
- Save the image as a .gif or .jpg as a file on your computer.
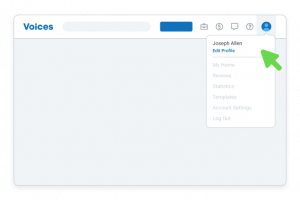
- Sign into your account and access the profile editor by hovering over the ‘Me’ avatar in the top navigation bar and selecting ‘Edit Profile’
- Scroll to the Profile Photo section and select ‘Upload Photo’
- Browse your computer for your image file, select it and the file will appear in the Select File box.
- Click ‘Save Edits’ at the bottom of the profile page.
- Your picture will now appear in the Profile area of your account and will accompany your portfolio samples in search.
Read more about creating a winning profile.
Next, let’s look at how to add those services and skills we mentioned earlier that tell us which job opportunities would be a good fit for you.
Your Services
The services available on Voices are: Voice Over, Audio Production, Music, and Translation. Each service you add to your profile is viewable on a separate tab of your profile because this allows you to showcase information and portfolio samples specific to that service. The information you tell clients about your voice over abilities is very different from the information you’d share about your audio production abilities.

Adding a Service
Add the services you offer by selecting the ‘+ Add’ button from the left ‘My Services’ toolbar. Then use the dropdown menu to add your skills for that service.
Removing a Service
Select the service you’d like to delete from the ‘My Services’ toolbar to the left of your profile. Scroll to the bottom of the page and on the left you’ll see a red ‘Delete’ button.
All skills for that service must be deleted before you can delete a service.
Deleting a service from your profile will have the following impact:
- You will no longer receive job invites for that service
- Any previously matched jobs that you have not responded to will be removed from your hiring jobs list
- All public profile presence will be removed, including any uploaded portfolios
- Any active responses to jobs, as well as jobs that you have been hired for, will remain open with the potential for you to be contacted by the client
This action cannot be undone.
Your Skills
For every service you add to your profile you’ll need to add correlating skills. For example, if you added Audio Production as your service, you might choose Audio Editing as your skill. If you added Music as your service you could add Jingles or Music Composition as your skills. If you added Translation as your service you could add English to French and French to English as your skills. If you added Voice Over as your service you could add Business or Education as your skills.
Your skills allow JobMatch™ to match you with jobs. Be sure to select at least one skill within each of the services you offer.
Quick tip: If you have added Translation as a service, you’ll be asked in the modal to select a source language and a target language. The language you’ll be translating from is the source language, and the language you’ll be translating to is the target language.
For a more detailed look at adding services and skills read this FAQ.
Adding a Skill – Voice Over
- Select ‘Voice Over’ from the ‘My Services’ toolbar on the left of your profile.
- You’ll land on your ‘Overview’ page. Scroll down to ‘Skills’.
- Click the drop down menu under ‘Voice Over Skills’. Multi select the skills you want to receive job invites for.
- Scroll down to the bottom of your page and click ‘Save Edits’ to save your selections.
Quick tip: Business, Education, Internet Video, Television, and Radio are clients’ top requested skills in Voice Over, but consider that just a starting point! Add all skills that make sense for you and know that you can come back and change these skills at any time.
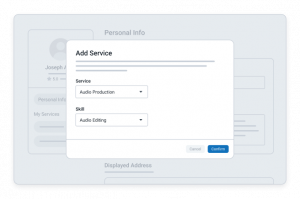
Adding a Skill – Audio Production, Music, Translation
- Select the service you’d like to add a skill to from the ‘My Services’ toolbar on the left of your profile.
- Click the blue ‘+ Add Skill’ button.
- Choose the skill you want to add from the dropdown menu. (Any skills you’ve already added to your profile for that service will be greyed out.)
- Select ‘Confirm’.
- Your new skill will now be added to your service. Follow the instructions to complete your skill.
A complete skill ensures clients have all the information they need to make a hiring decision.
Removing a Skill – Voice Over
- Select ‘Voice Over’ from the ‘My Services’ toolbar on the left of your profile.
- You’ll land on your ‘Overview’ page. Scroll down to ‘Skills’.
- Click the ‘x’ button beside the skill you’d like to remove.
- Scroll down to the bottom of your page and click ‘Save Edits’ to save your changes.
Removing a Skill – Audio Production, Music, Translation
- From the ‘My Services’ toolbar on the left of your profile select the service you’d like to remove a skill from.
- Select ‘Edit Skill’ on the skill you’d like to remove.
- Navigate to the bottom of the page and click ‘Delete’, then select Delete’ again to complete the action.
Skill Overview and Skill Description
Once you add a skill you’ll want to provide a summary of your abilities within that skill and why someone should hire you. A complete skill ensures clients have all the information they need to make a hiring decision.
The ‘Complete Your Skill’ section will list the fields you still need to fill out so you know exactly what to do to make your skill look the most attractive to potential clients. Be as specific as you can about your capabilities. Some sections may differ depending on which skill you’re filling out.
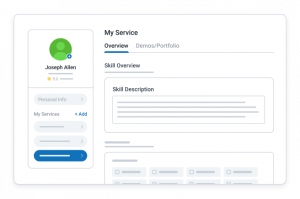
However, your Overview, photo, name, location, star rating stays the same on each of your service tabs. This way clients can get to know you and also see the specific information they need to understand if you have the right skills in the service they require.
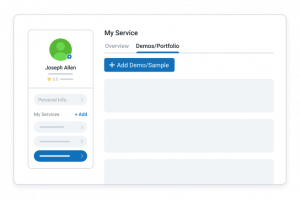
Demos and Portfolio Samples (+ how search works)
For each skill you add, you must add either a demo (voice over) or a portfolio sample (audio production, music, and translation).
Our search results always showcase a demo or portfolio sample so without one you won’t appear in clients’ search results and you miss out on the opportunity to be privately invited to jobs.
Quick tip: Aim to upload at least one demo or portfolio sample per skill for your best results in search and job opportunity matches.
Uploading A Demo – Voice Over
Ideally, you want one demo per skill on your profile. So, if you added Business, Education, and Radio as your skill to your Voice Over service, then you want to have at least one demo in Business, Education and Radio.
When you’re starting out we recommend uploading a commercial or narration demo, but that’s not a hard and fast rule. If you’re more of an animation person, add that first! Just be sure to work up to one demo per skill.
Finally, your demo file must be an .MP3 file.
To upload your demo:
- Click ‘Edit Profile’ from your ‘Me’ drop down in the top right of your Voices profile.
- Select ‘Voice Over’ from ‘My Services’ in the left toolbar.
- Across the top you’ll see three tabs: Overview, Demos, and Statistics. Select ‘Demos’.
- Select ‘+ Add a Demo’
- Complete the prompts to title, describe, and tag your demo.
- Finally, select ‘Add Demo’ at the bottom of your screen and you’re done!
For more detail on how to title, describe, and tag your demos, click here.
After you upload a demo you’ll be taken back to your Demo page. Here you’ll see all of your voice over demos.
Changing the order of your demos
When clients visit your profile they’ll see your top five demos. Change the order of your demos by dragging and dropping each demo. Click ‘View Profile’ in the top right of your profile to see what your profile looks like to clients. Click ‘Edit Profile’ to come back to edit mode.
Read more on how to maximize your demos and portfolio samples here.
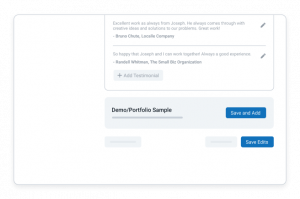
Uploading A Portfolio Sample
Ready to upload an audio production, music, or translation sample? Perfect!
Audio production and music portfolio samples will be an MP3 file. Translation samples will be a JPEG or PDF file.
To upload your portfolio sample:
- Click ‘Edit Profile’ from your ‘Me’ drop down in the top right of your Voices profile.
- Select your desired service from ‘My Services’ in the left toolbar.
- If you already have the appropriate skill added, choose ‘Edit Skill’.
- Across the top you’ll see two tabs: Overview and Portfolio. Select ‘Portfolio’.
- Select ‘+ Add Sample’.
- Complete the prompts to title, describe, and tag your demo.
- Finally, select ‘Add Sample’ at the bottom of your screen and you’re done!
If you don’t have the appropriate skill added, choose ‘+ Add Skill’ and follow along from step 4.
Once you’ve uploaded a portfolio sample you’ll be taken back to your ‘Portfolio’ page for that skill. Just like with your demos, here you can rearrange the order of your samples by dragging and dropping.
For more detail on how to title, describe, and tag your portfolio samples, click here.
Work Experience
This section comprises your Client List and Testimonials. Clients want to see past work experience that is similar to the job they are posting. Highlight any previous work pertaining to that skill or specific industries you specialize in.
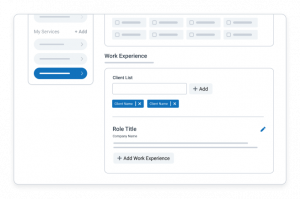
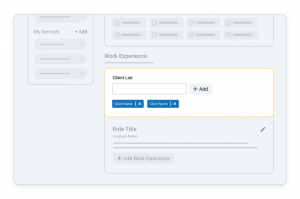
Client List
This is where you can enter a pointform client list. Many experienced talent opt to enter a partial list primarily containing brand name clients they’ve worked for. If you’re unsure whether a client is comfortable being included, make sure to reach out to them first.
Adding a client to your Client List:
- Select your desired service from ‘My Services’ in the left toolbar.
- Click ‘Edit Skill’ on the skill you wish to add a client name to.
- Scroll down to Work Experience/Client List.
- Type in the name of your past client.
- Select the ‘+ Add’ button to add this client to your Client List.
- Scroll down to the bottom of your page and click ‘Save Edits’ to save your changes.
You can rearrange the order by dragging and dropping the client names.
Removing a client from your Client List:
- Select your desired service from ‘My Services’ in the left toolbar.
- Click ‘Edit Skill’ on the skill you wish to remove a client name from.
- Scroll down to Work Experience/Client List.
- Select the ‘x’ button to remove this client from your Client List.
- Scroll down to the bottom of your page and click ‘Save Edits’ to save your changes.
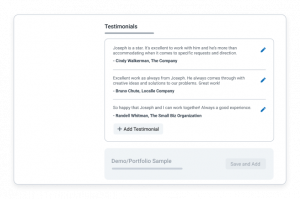
Testimonials
If you have a client base already established with references or testimonials that you can use publicly, enter them here. Show off what others have said about the work you’ve done outside of Voices.
Clients have told us that reviewing testimonials can be the deciding factor in whom they award their project to.
You can type the testimonial and the company or person you’ve received it from in this section.
Adding a testimonial
- Select your desired service from ‘My Services’ in the left toolbar.
- Click ‘Edit Skill’ on the skill you wish to add a testimonial to.
- Scroll down to Work Experience/Testimonial.
- Select ‘+ Add Testimonial’.
- Fill out the ‘Testimonial’ and ‘Company Name’ sections.
- Click ‘Add’ and you’re done!
Edit a testimonial by selecting the pencil icon beside the testimonial you’d like to change.
Removing a testimonial
- Select your desired service from ‘My Services’ in the left toolbar.
- Click ‘Edit Skill’ on the skill you wish to remove a testimonial from.
- Scroll down to Work Experience/Testimonial.
- Select the garbage can icon, then select ‘Delete’.
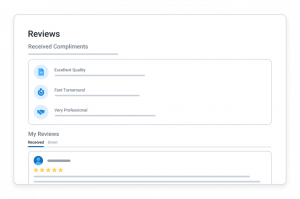
Ratings, Reviews, and Compliments
Clients can leave a feedback rating and review for you, and you can do the same for them. They can also leave a compliment if they feel you excelled in a particular area. Compliment badges and reviews are displayed on your profile and are a great way to build your online reputation.
For more information on leaving a review or changing a review check out this FAQ and this blog post.
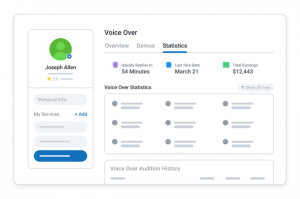
Statistics
Analyze your progress and do more of what’s working for you. Only subscribing voice over talent have access to Statistics.
Find Inspiration from Top Talent on the Voices Leaderboard
The Voices Leaderboard is a great place for talent to find inspiration—and maybe even a little motivation! The Leaderboard showcases the best and the latest up-and-coming talent in all our services. Categories like ‘Favorites’ and ‘Most Reviews’ are excellent places to go if you’re newer to the industry and want to see what the pros are doing. Of course, you don’t want to copy them; however, it can be an excellent way to see how it’s done and add your spin to showcase what you bring to each job.
Learn more about the Voices Leaderboard here. Visit the Voices Leaderboard here.
Replying to Jobs
Your ‘Jobs’ tab (found in the top navigation bar of your profile) is where you’ll see everything related to jobs you’ve been invited to respond to and jobs you’ve been hired for.
Let’s get started by talking about how jobs are matched to you.
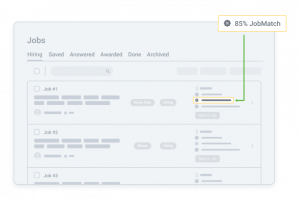
Learning About JobMatch™
JobMatch™ compares your profile, demos, and portfolio samples to a client’s job posting. Certain fields on your profile, demos, and portfolio samples line up with the job posting form, which is how we’re able to accurately match you with jobs.

Your JobMatch™ score lets you know how closely matched you are to a job posting. JobMatch™ is a score out of 100. Your score for each job is indicated on your Hiring list as well as on the job details page. The higher your score, the better matched you are to the client’s requirements. The more complete your profile, the better your JobMatch™ scores, the more jobs you’re best suited for in your inbox.
Quick tip: Use these 3 tips for maximizing your JobMatchTM scores.
- Make sure your profile is 100% complete.
- Upload unique demos and portfolio samples in each skill you added to your profile.
- Max out the tags on your demos and portfolio samples.
For more information, check out this blog post about JobMatch.
Now that you know how jobs land in your Jobs tab, let’s take a look at how your Jobs tab is set up (hint: it’s to keep you organized!)
Navigating the Job Lists
Along the top of your Jobs page there are six tabs to help you keep track of your jobs:

- Hiring
- Saved
- Answered
- Awarded
- Done
- Archived
You can also navigate to these pages by hovering over Jobs, located in the navigation bar at the top of your page.
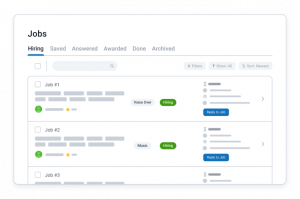
Hiring
Jobs you’re invited to respond to are listed under Hiring. Here you’ll see high-level details about the job. These include:
- Posted date
- Who the job was posted by and their rating and reviews
- The job’s Service
- The job’s Status
- Budget
- Number of responses received so far
- Your JobMatchTM score
- Response deadline
- ‘Save for Later’ icon
- And finally the ‘Reply to Job’ button
Click anywhere on the job to view the job’s details. Click the ‘Reply to Job’ button to go directly to submit your response.
How should you prioritize which jobs to respond to first? Great question! And one our pro talents have answered in detail in this blog post.
Quick tip: Start with the newest jobs (those with the highest job number) and work your way down.
Saved
You’ll see a small grey bookmark icon next to the ‘Reply to Job’ button—that’s your Save icon.
![]()
When clicked, this button will turn purple, indicating you’ve added it to your ‘Saved’ tab. This Save button also appears on the Jobs Detail page at the top right, between the ‘Reply to Job’ button and the ‘Archive Job’ button.
Quick Tip: Save all the jobs you plan to respond to, click the ‘Saved’ tab and find them all there, ready for you to respond to.
Click here for more information.
Answered
Jobs you’ve responded to will live here.
You’ll also see how clients have interacted with your response through icons.
Quick tip: Use the Show and Sort filters to quickly look through your Answered jobs.
Head over to Getting Familiar with the Job Icons and Understanding Job Status sections of this user guide to learn more about how clients are interacting with your responses to their jobs.
Awarded
All jobs you’ve been awarded—i.e. hired for—will appear here. This is where a job will live while you’re completing the work for it.
Done
Your job will move to Done once you’ve completed the work—nice job!
Archived
Don’t want to respond to a job and just want to move it out of your way? Archive it! Click into the job, then select the Archive icon in the top right.

Quick tip: Enter the job number in the Search filter to quickly find a job on any of these tabs.
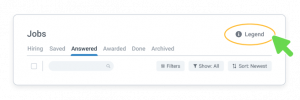
Becoming Familiar with the Job Icons
Next to each job in your Job List you will see a variety of icons. Don’t worry if you can’t remember them all now—we have a Legend on your Jobs tab with all of these definitions. Simply click the Legend icon to view.
Featured
![]()
A purple featured icon indicates the client is expecting a fast response and generally a fast turnaround of the project once you’re hired. Prioritize responding to these jobs.
Private Invites
The Private Invite icon indicates that you’ve been privately invited to this job. This means the client has specifically invited you to respond to their job after finding your demo or portfolio sample in our search or browse experience.
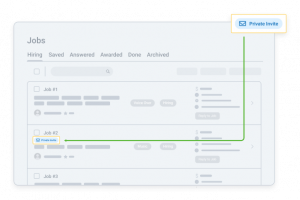
Clients have the option of privately inviting you, and other talent, to their jobs. Private invitations are usually sent when a client is particularly interested in hearing you respond to their job.
You’ll also see Private Invitation in the subject line of the job notification email.
These are also jobs you should prioritize responding to.
Public Invites
Clients can request that public invitations—or open calls—be sent to talent whose profiles best match their job’s requirements. Clients choose to post jobs publicly when they would like to hear from a variety of talent before awarding their job.
Subscribed members (Premium and Platinum members) have access to public invitations. Subscribed members automatically receive invitations to submit to these postings.
You’ll see your invitation to respond to public jobs in two places:
- Your Hiring list on Voices.
- Your personal email inbox (depending on the settings you selected in Account Settings/Account/Email Setting).
You’ll know it’s a Public invite by the subject line of the job notification email.
Managed Service Jobs
A blue ‘V’ icon indicates that this job was posted by a Voices Account Manager and is a Managed Services job. Generally, clients enlist the help of our Managed Services team when they need an extra layer of support for their project. It could be they’re short on time and need someone to coordinate the posting, casting (with the client having the final say) and edits. Or, they need work done in multiple languages and they need help sourcing talent. Whatever the client needs, our Managed Services team is here to educate and direct clients to help them find the best talent for their project.
Click here for more information.
Viewed – Translation
![]()
Your response has been viewed by the client.
Listened – Voice Over, Audio Production, Music
Your response has been listened to by the client.
Shortlisted
Your response has been added to a shortlist.
This is a great sign! It means the client likes what you put forth and you’re in the running to get the job. Generally speaking, if you’re being shortlisted for jobs it means being hired for one isn’t far away – if it hasn’t happened already!
Responded and Archived
Identifies jobs in your Archived tab that you’ve responded to. If you responded to a job and then Archive-it you remove your response from a client’s list of responses.
Quick tip: Clients often privately invite talent to a new job from responses they liked on an old job.
Worked Together Previously
You have been hired by this client before.
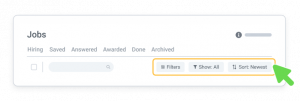
Sort/Filters/Show
Looking to narrow down your jobs to certain criteria? Easily done! Select Filters, Show or Sort to organize your jobs to suit your workflow.
Quick tip: You’ll see a number beside your Filters if you have filtered your Job list. This will narrow down, i.e., reduce the number of jobs you’re seeing in your list. To clear your Filters select ‘Filters’, then ‘Clear’ to see all jobs matched to you.
Understanding Job Status
The status of a job gives you helpful information at a glance. Again, don’t worry if you don’t memorize all these now. You can find Job Status definitions in the Legend on your Jobs tab.
- Hiring – This job is accepting responses. Go for it!
- Deciding – This job is no longer accepting responses and the client is deciding on the right talent for their gig.
- Offering – Only the successful talent will see this status as a reminder to accept the Job Agreement.
- Working – The Job Agreement has been accepted and the job is in progress.
- Done – You’ve successfully completed this job and the payment has been released to you.
- Completed – If you responded to this job but weren’t hired you will see this status instead. No further action is necessary.
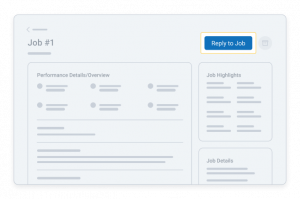
Seeing the Job Details
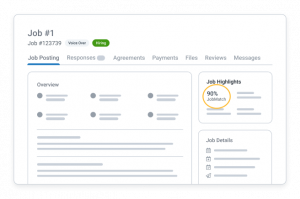
See a job that piques your interest? Let’s dig into it! From your Hiring list, click anywhere on the job card to be taken to the ‘Job Details’ page. This page fully describes the project requirements, budget range, response deadline, and project deadline.
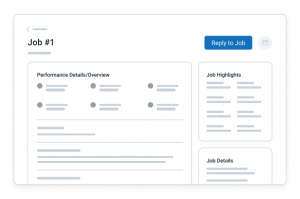
Here you’ll see everything you need to know to decide if this job is right for you. You’ll see:
- Performance Details – These will change based on which Service the job is in, but here you’ll see things like language, accent, software, genre – information that’ll help you understand the creative direction the client is looking for.
- Job Highlights – Here you’ll see the job specs (budget, usage, word count, length, etc.) that’ll help you create your quote.
- Job Details – This contains date information like when the job was posted, when responses are due, and the date the client needs the job done called ‘Project Deadline’. It’s important to check this date and make sure you’ll be available to complete the job by this deadline. Best practice is to review the job highlights for the specs, estimate how long it’ll take you to complete that work, and make sure your schedule allows you to meet the job requirements and the project deadline before responding.
- Client Details – Shows you who the job was posted by, a link to their profile, and their star rating.
- ‘Report a Concern’ button – Use this when you see a job that isn’t E for everyone. We have filters and a Customer Support team that prevent 99% of inappropriate jobs from getting through to you but if you do see one that doesn’t align with our E for everyone rating please flag it so we can let the client know what’s appropriate on Voices.
- ‘Print Job’ button – Useful if you like to print off scripts for your reads.
Responding to a Job
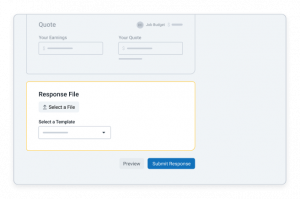
Ready to respond to a job? How exciting! Your next step is to create and then upload your response.
Your next step: Click the ‘Reply to Job’ button located at the top right of your ‘Job Details’ page.
You’ll be taken to the ‘Response Page’. We’ve organized the Response page to help you nail your response by always showcasing vital information like performance details, job highlights, and job details on the right side of your page so you don’t have to flip back to the Job Details page as you’re uploading your quote or proposal. Nothing like getting to the quote section and forgetting how much the client said they had for the budget to make having the job details on the side be a welcome feature!
Responding to a job requires 3 steps:
- Add your Proposal
- Set your Quote
- Upload your Response File
You can only submit to a job posting once so please do not reply to the job until you are ready to send in your response.
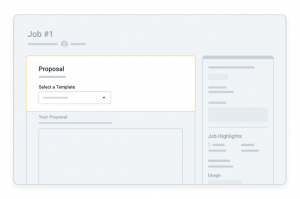
Adding your Proposal
Send the client a short note explaining why you are the best candidate for the job. Think of this as your cover letter. Additionally, it’s imperative to answer any questions a client asked in the job posting in your proposal.
A persuasive and relevant proposal can be the tipping reason a client decides on your response.
Add your proposal by either selecting it from a template you created previously or typing it in.
Quick tip: Use {Client Name} where you want the Client’s first name to be auto-filled. The name will be shown on Preview and Submitted Response.
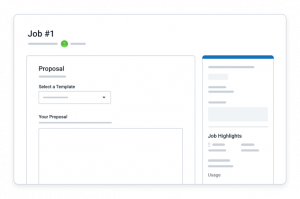
Need some help getting your proposal started? We can help! We’ve created proposal templates for you which you can find under ‘Me’ / ‘Templates’ in the top navigation bar of your Voices profile.
Creating Templates
Save time replying to jobs by creating templated proposals. To add a new proposal template:
- Hover over the ‘Me’ dropdown in the top navigation bar.
- Select ‘Templates’
- Select ‘Create Template’ to create a new template from scratch or select the ‘Edit’ pencil icon beside the default template already on your profile to add your spin to a pre-created template.
- Add your Template Name.
- Select the Service you’d like this template to be for.
- Write your Proposal.
- Write your Revision Policy *optional*.
- Click Save.
What’s a Revision Policy? Explain what you include free of charge and/or your rate for additional project changes.
Now when you respond to a job in the Service you selected for this template you’ll see this as a template.
Make as many templates as you think you’ll need to address the different types of jobs you will be responding to.
Quoting on the Work
The client will include a fixed budget or a budget range to help guide you. When you enter your quote you’ll see the amount you’ll take home and the amount the client will see with your response. These two fields are ‘Your Earnings’ and ‘Your Quote’.
Your Earnings = The amount you will be paid if you book the job.
Your Quote = The amount the client will see with your response. We do this to be transparent with the fees on Voices. You’ll see a 20% platform fee added to Your Earnings. This fee helps us provide you with the technologies, tools, and support to facilitate the matching of talent to job opportunities, and the fast and secure exchange of services between clients and talent. Click here to learn more.
You can easily adjust the amount in Your Earnings or Your Quote. This allows you to see in real-time what you’ll earn and what the client will be quoted.
Quote whatever you feel is fair for the work being requested and your skillset. Try not to quote less than their minimum budget and if you quote above their minimum budget explain why in your proposal.
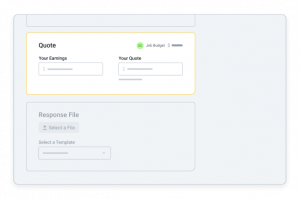
Uploading Your Response File
To upload a custom demo, click on the ‘Browse’ button to locate the file on your computer hard drive. You will receive a confirmation that your response was submitted successfully once you have clicked on ‘Submit’ to conclude the response process.
Voice Over Submitting a Custom Response
When responding to a voice over job posting, there will be a sample script, and it is recommended that you record a custom response using a portion of the script provided (e.g. 20 to 30 seconds of recorded material).
What clients are looking for when they request a voice over custom response is your interpretation of the script copy provided, correct pronunciation of potentially difficult words, and an example of what you can produce in a specified time frame. If you do take the time to record a twenty-second dry voice read, select a portion of the script that will best show your skills and be sure to protect your work by using the tools available to you.
Once you submit your response and review it from your ‘Answered’ tab you will see your actual placement in the total number of responses received by the client.
A copy of your response will be recorded in your ‘Answered’ jobs area for future reference.
Audio Production, Music, Translation
For audio production, music, and translation, we encourage you to submit a response file from among your portfolio samples that most closely suits what the job posting is requesting and shows that you have the skills to complete the project. There may be times where a job posting specifies something more customized, and then it’s entirely up to you whether you have the time to put something more customized together. Keep in mind as well, that your proposal is another important part of the process and contributes to the impact of your overall response.
Just like with a Voice Over response, once you submit your response and review it from your ‘Answered’ tab you will see your actual placement in the total number of responses received by the client.
A copy of your response will be recorded in your ‘Answered’ jobs area for future reference.
Job Agreements/Agreeing to the Terms
When a client awards a job to you, an agreement is sent for your review, solidifying the terms and deadlines you’ve discussed. Accept the agreement to move ahead with the job.
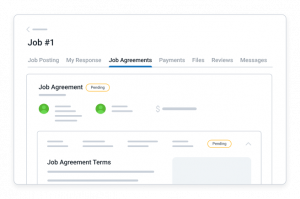
Click here and here for more information on Agreements.
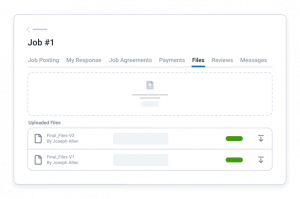
Uploading Finished Work
Deliver completed work to a client by uploading the project files to Voices. Drag and drop or click to upload makes it simple and straightforward.
Why Create a Project for Project Marketplace
Project Marketplace will give clients the opportunity to browse and buy projects directly from you. For clients, this will eliminate uncertainty, give them the option to hire instantly, and give them pricing transparency. Buying a project also eliminates the back and forth process involved in fielding responses.
For you as a talent, creating projects gives you another great way of earning money on Voices.
When you create a project you:
- Control the scope of work
- Get hired without the back and forth of auditions and responding to jobs
- Create the project once and have clients come to you
- Create projects for the things you love to do and sell what you do best
- Customize packages within your projects to allow for pricing flexibility
Getting Started
You can post an unlimited number of unique, feature-rich project listings in Project Marketplace at any one time.
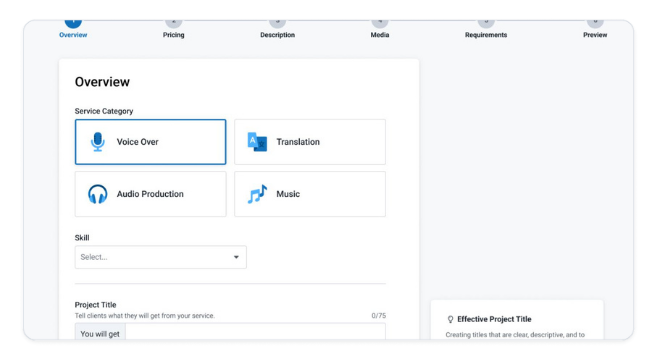
Overview
1. Under the Me dropdown, go to Manage Projects.
2. Click on the Create Project button at the top-right of the page.
3. Start with the Project Overview by choosing your Service and Skill.
4. Fill in a strong Project Title that clearly describes what the client will get from your project. We’ve provided some examples of strong titles right in the platform to help guide you. Keep in mind the maximum character count of 75 characters.
5. Fill in any other relevant details—some fields related to the Service and Skill you’ve selected will populate automatically, others you’ll need to fill in.
For more detailed information on creating projects for Project Marketplace, check out the full Project Marketplace Guide.
Getting Paid, Guaranteed
SurePay™ Secure Payment
Work with peace of mind on Voices. When you’re hired, Voices’ SurePay™ system takes client funds and holds them securely while you work.
Clients can manually release your funds to you after the work is done, but if they don’t, your funds are automatically released to you 14 days from the Agreement’s Delivery Date and paid out to you the following Friday via PayPal or Cheque. Funds released between Saturday and Friday will be paid out the following Friday. If you choose PayPal as your payment method, PayPal releases your funds to you the following Friday.
Voices covers all transaction fees associated with PayPal, so you get your funds as quickly and as easily as possible.
![]()
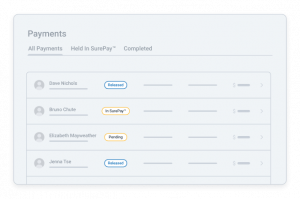
Payments List
See the list of your payments that have been completed at Voices. Search previous payments and click into payment details for more information. You’ll see three sections in the top navigation:
Held in SurePay™ are payments being held securely by Voices, which will be released to you once your client has received the completed work.
Completed are payments Voices has released to you.
All Payments is a summary of both of these transactions in one spot.
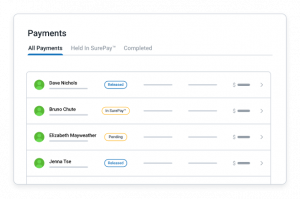
Payment Status
The three statuses you will see are Pending, which means the payment from the client has not yet been deposited, In SurePay™, which means the client payment is being held securely while you work on the project, and Released, which means the payment for that project has been released to you.
Payment Preferences
Let us know how you want to be paid, be it PayPal or a cheque in the mail. We cover the PayPal fees associated with your payment and you’ll receive funds more quickly than via cheque in USD.
Handling Additional Payments
While working a job, it may be necessary for the client to pay you more than what was previously outlined in the Agreement. If that’s the case, you can request via Messages that the client add an Additional Payment to the job.
For more information on how to add or reduce funds on a job, refer to this FAQ.
How do you view payments made to you? Easy! Click on ‘Payments’ to view all payments. On the Payments screen, you’ll see a list of your payments with information such as the job the payment was for, the date you received the payment and the amount.
Head to Tweaking Your Settings/SurePay Payment Settings to set up how you’d like to receive payment for jobs you book on Voices.
Communicating With Clients
Manage all incoming and outgoing messages, including system messages from Voices and individual conversations with clients.
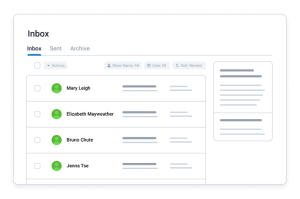
Inbox
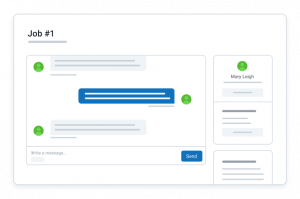
Messages from clients and Voices Account Manager (who are managing jobs on behalf of clients) will appear in your inbox. Clients can send messages to you to start the exchange, at which point you can send them a reply, communicating about the project as needed.
For your safety and security, it’s important all communication and file uploads are done through Voices. By keeping all messaging and file uploads on Voices it ensures we have a complete record of the work being asked of you and your delivery of the work. This enables us to ensure you’re paid for the work you complete.
Taking jobs off of the Voices platform to circumvent the SurePay system is against our Terms of Service. By working on the Voices platform you agree to the Terms of Service. If you ever have any questions about what is or isn’t allowed on the Voices platform, please reach out! We’re happy to help.
Sent
Review messages you have sent to clients. You also have the ability to:
- Show messages from a certain client through the ‘Show Name’ filter.
- See messages from certain date ranges or see only unread messages through the ‘Date’ filter
- Sort messages from newest – oldest or oldest – newest with the ‘Sort’ filter
Message Details
View the contents of a conversation in a message’s details. All messages have timestamps and read receipts.

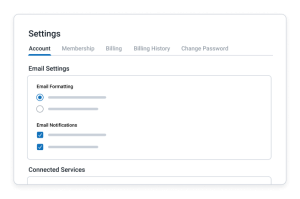
Tweaking Your Settings
Your Account Settings houses information about you. None of the information you add here is displayed publicly. Your information is only accessed by authorized system administrators and support representatives to help answer questions regarding your account. More specifically, we use this information to communicate with you.
Your Account Setting also houses your preferences on how you’d like Voices to interact with you. Your information and preferences are only used to curate your ideal experience on Voices so you can benefit from personalized service from us.
Let’s review each tab.
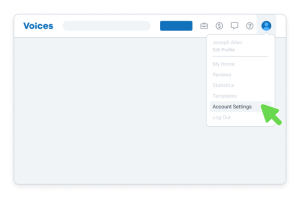
Your next step: Hover over your Me icon in the top right corner of your profile. Select Account Settings from the drop down menu.
Account Settings
Contact Information
The following information is not displayed publicly.
Email Address – Change the email address associated with your account at Voices here.
Phone Number – Adding your phone number allows the Voices team to connect quickly with you for special request jobs.
Company Name – Enter the name of your small business, or your first and last name.
Mailing Address – Your mailing address is required for billing and payment purposes.
Vacation Status
Everyone needs some time off! Enter the dates you’ll be unavailable. These dates will be shown to clients on your profile. You’ll still get notifications for jobs (but you can easily change this by scrolling to Email Settings).
Time Zone
Pick your time zone so that clients know if you’re ready to work. This is used to update deadlines and messages to match your local time.
Email Settings
Email Formatting
Choose the kind of email you’d like to receive from our team:
- plain text with no graphics
- or HTML with graphics and colour
Email Notifications
News, Events, Offers: You’ve automatically opted in to our emails at sign up. You can opt out of receiving news, events, and offers from Voices by de-selecting “Yes, please keep me updated about Voices news, events, and offers.”
Quick tip: Keep these emails to ensure you receive:
- help from us about how to be successful with your membership
- reminders about your upcoming renewal if you’re a subscribed member
Job Notifications
To receive email notifications about new jobs you’ve been matched to, you must have “Yes, send me notifications related to jobs that I have replied to or have been awarded” turned on. By default, this is turned on for everyone so you don’t miss that next opportunity to wow a client and book work.
Job notifications include:
- job invitations
- job status updates
- client messages
- payment information
You can customize which types of job invitations you would like to receive notifications for. We have two types of job invitations:
- Public invitations – Jobs automatically matched to our subscribed members. (See more about these under Replying to Jobs/Public Invites.)
- Private invitations – Jobs where the client has personally selected you to respond. (See more about these under Replying to Jobs/Private Invites.)
Additionally, you can choose the budgets you’d like to receive email notifications for. If you change this from the minimums, you’ll continue to see jobs at every budget in your Hiring inbox. You’ll just only get email notifications for jobs at/above your stated budget.
Quick tip: Keep Private invitations turned on. You want to respond to those jobs quickly because you were handpicked by the client to respond to their project.
Connected Services
Instead of entering your email and password to create an account, social sign-on (SSO) allows you to use your Google information to sign up for a Voices account. SSO also allows you to log into your existing Voices account simply by selecting “Sign in with Google” on the login screen instead of entering your username and password.
Turn on SSO by selecting Sign In With Google.
Read more about SSO, here: Social Sign On FAQ.
Additional Options
Requesting your Voices Information
At all times, you have the right to ask for access to the information in your file and request that we update your file for accuracy or correct any errors. You can update your information here in your Settings or contact us at [email protected] for any further help.
Closing your Voices Account
Turns out Voices isn’t right for you? Not a problem. You can request to close your Voices account by selecting Close Account.
Your next steps: Set up your preferences under Settings/Account. Click Save Changes when you’re happy with it.
SurePay Payment Settings
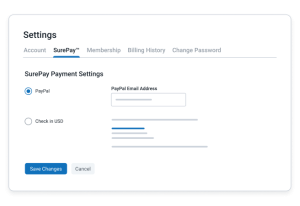
How will you receive payment?
Choose from either:
- PayPal
- Cheque in USD
PayPal
Paid via PayPal is on by default because it’s the fastest way for us to pay you.
Quick tip: Sign up for a free PayPal account because Voices covers all transaction fees associated with PayPal. Our way of helping you keep more of the money you make on Voices. Check out this FAQ for more information on creating a PayPal account.
Cheque
Please ensure your mailing address is up to date on your Settings/Account/Contact Information. If you use a pseudonym and need the check payable in a different name, please contact our support team.
Your next steps: Enter your PayPal email address under ‘PayPal Email Address’ so we know where to send your funds and you can start receiving payments right away.
Membership
Shows your current plan.
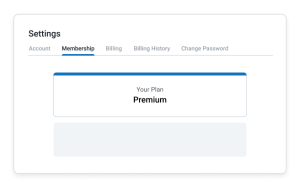
If you’re a subscribed member you’ll also find your:
- Renewal date
- Renewal amount
- Payment Information
- Cancel membership button
Cancel Membership
We understand that sometimes things don’t work out the way you want them to, and sometimes situations change and you’re not able to respond to jobs on Voices anymore—that’s okay. We’ve made it easy to cancel your membership. Select ‘Cancel Membership’ and follow the on-screen prompts.
You’ll receive a confirmation email that your membership cancellation request was received and a member of our team will follow up with you to confirm your membership renewal has been stopped.
Check out this FAQ for more information.
Billing History
A list of all your (membership) payments to Voices. Great to refer back to at tax time as many of our talent members write off their membership fee as a business expense.
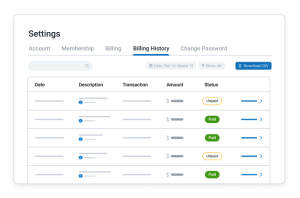
Need to find your membership purchase receipt? Easily done!
If you purchased your membership over the phone, by credit card, or by Paypal, you will have received your receipt by email for your records at the time of purchase.
To access a copy of your receipt from within your Voices account, follow these steps:
- Hover over your Me avatar in the top right corner. Select Account Settings then Billing History.
- Click View to see the details of a specific payment. From here, you have the option of printing.
Change Password
You can make changes to your password in this area of your account. Simply enter a new password, confirm and hit save.
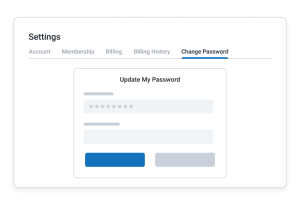
Your password must be at least 8 characters in length and must include one upper case, one lower case, one numeric, and one special character.
Mobile App
Primarily for our subscribed (Premium, and Platinum) talent the Voices Mobile companion app helps you stay on top of your jobs while on the go.
What can you do on the app?
- See job opportunities in all our creative services
- Narrow down your job opportunities with ‘Save for Later’ and ‘Archive’ features
- Accept Job Agreements
- Upload files to working jobs
- Send messages
- Check on your payments to see when you’ll be paid
More information can be found here.
Trust Center
We’re building the largest community of creative talent in the world, starting with our Trust Center. Here, you can see how we’re facilitating connections for work while keeping you safe and secure online. Visit the Voices Trust Center.
Privacy Policy
Protecting your privacy and the confidentiality of your personal information is fundamental to the way we conduct business at Voices. Link to Voices Privacy Policy.
Community Guidelines
Voices members are expected to follow these guidelines that help keep our community a respectful and uplifting place. We are all a part of creating that environment. Link to Voices Community Guidelines.
Terms of Service
By working on the Voices platform you agree to the Voices Terms of Service. Link to Voices Terms of Service.
Resources and Customer Support
Sometimes you need to talk to a real person and sometimes you might prefer to find the answer on your own. That’s why we’ve got resources for both.
Our Customer Support team is available to you Monday to Friday 8am ET- 8pm ET. You can easily get us on the phone by calling our toll free number: 1-888-349-3472 or sending us an email. You’ll see a reply to your email within 24 hours on weekdays and the following Monday after a weekend.
Prefer to find the answer on your own? No problem. We’ve got:
- Help Center
- Resources Library
- Voices Lessons
- Blog,
- Podcasts
- YouTube channel
- Community Forum
- Webinars
Our Help Center, Resources Library and Voices Lessons are great for explaining what features we have and how to use them.
Our Blog, Podcasts and especially our YouTube channel and Community Forum go into detail about key strategies you can use to be successful. We also provide in-depth tutorials to help you up your craft so you see success on Voices and everywhere else you get work.
Our Webinars are a combination of Voices-led how-to help and performance/technical help led by expert voice over coaches.
Community
The Community page is a great place to grow your creative network.
And lastly, let us introduce you to our Community Forum!
You put a lot of effort into making your business work and the lessons you learn along the way are crucial to seeing a good return. The Community Forum is a great place to see lessons from other talent—helping you succeed faster. You’ll see tips for working on Voices, get feedback from your peers on your work, and receive advice on how to be a successful small business owner.
Find the Community Forum via the Help dropdown on our site, in our blog top navigation bar, or by clicking here. It’s easy to access the Forum because your Voices login credentials give you access to the Forum. Click here to read more about the Forum.
We’re rooting for you!
The Voices Team